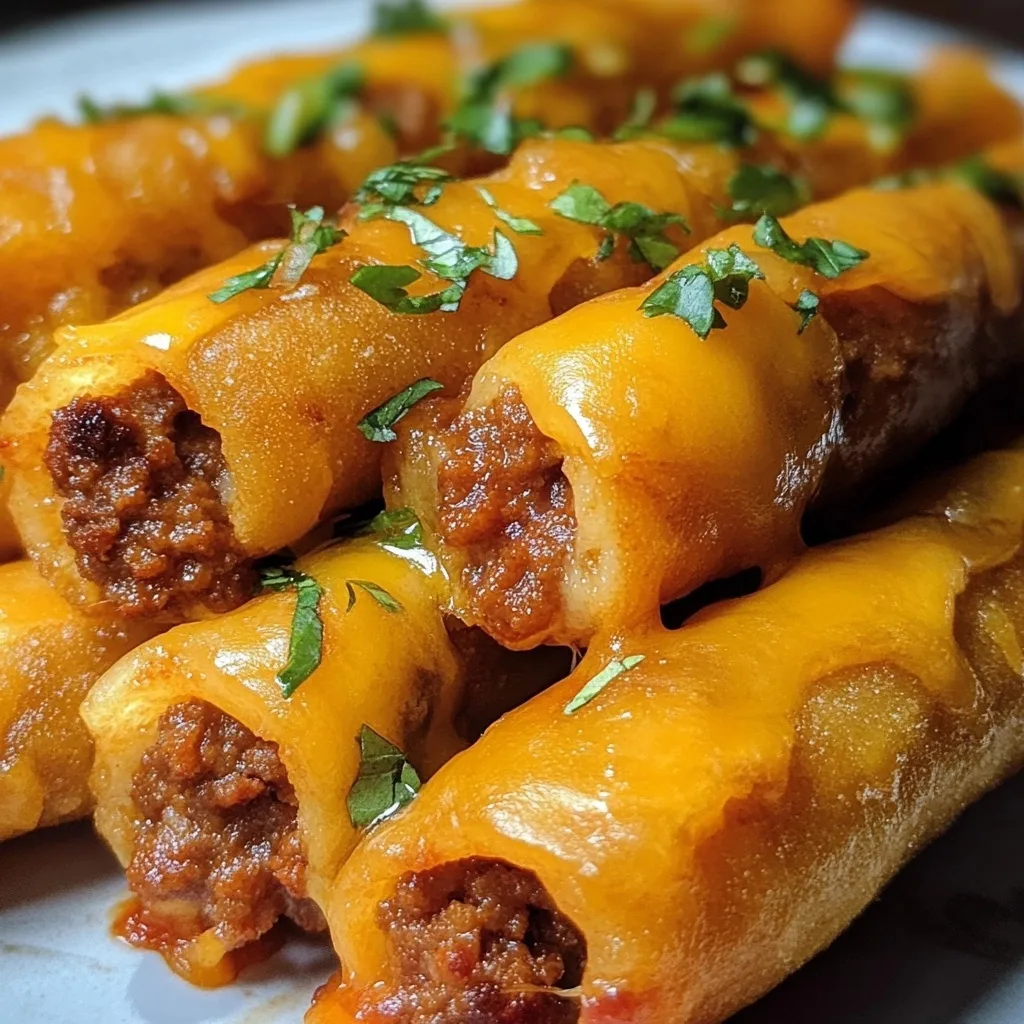
There’s something magical about the moment when Mexican-inspired taco flavors meet Italian-style bread sticks. Enter Cheesy Taco Sticks—the crowd-pleasing creation that combines seasoned ground beef, melty cheese, and golden-brown pizza dough into one irresistible hand-held package. These delicious fusion treats deliver all the bold flavors of a taco in a convenient, dippable form that’s perfect for game day gatherings, weeknight dinners, or any occasion that calls for fun, shareable food.
What makes these Cheesy Taco Sticks truly special is their versatility and broad appeal. Kids love the familiar flavors and the fun of dipping each stick into their favorite sauce. Adults appreciate the satisfying combination of protein, carbs, and cheese that hits all the right comfort food notes. And hosts love how easily they come together with minimal ingredients and effort—leaving more time to enjoy the company of family and friends.
Whether you’re looking for a fresh spin on taco Tuesday, a potluck contribution that won’t be duplicated, or simply a crowd-pleasing appetizer that’s sure to disappear quickly, these Cheesy Taco Sticks are about to become your new go-to recipe. Let’s dive into what makes them so irresistible and how you can customize them to make them uniquely yours.
Why You’ll Love These Cheesy Taco Sticks
These Cheesy Taco Sticks are more than just another appetizer recipe—they’re a game-changer for busy households and entertainers alike. First, they strike that perfect balance between familiarity and novelty. Everyone knows and loves tacos, but wrapping those flavors in a golden, flaky crust creates something excitingly different that still feels comfortably familiar.
The convenience factor cannot be overstated. Using refrigerated pizza dough eliminates the fuss of making dough from scratch, while still yielding impressive results. The entire recipe comes together in under 30 minutes of active preparation time, making it feasible even on busy weeknights when you’re juggling homework help, household chores, and hunger pangs from every direction.
Perhaps the most compelling reason to love Cheesy Taco Sticks is their incredible adaptability. The basic recipe provides a fantastic foundation, but you can easily adjust the spice level, swap proteins, add vegetables, or experiment with different cheese blends to suit your family’s preferences. They’re also perfect for using up leftover taco meat from a previous meal—simply reheat, stuff, and bake!
For parents of picky eaters, these sticks often succeed where traditional tacos fail. Something about the pizza dough wrapper makes formerly suspicious children willing to try—and inevitably enjoy—these flavor-packed treats. The hand-held format eliminates the “it’s touching other food” objection, while the melty cheese acts as a familiar gateway to the seasoned beef inside.
Lastly, these Cheesy Taco Sticks strike that elusive balance of being both casual enough for a Tuesday night dinner and special enough for entertaining guests. Served with a variety of dipping options and garnishes, they can be dressed up or down to suit any occasion.
Key Ingredients for Perfect Cheesy Taco Sticks
The beauty of Cheesy Taco Sticks lies in their straightforward ingredient list. Each component serves a specific purpose in creating that perfect balance of flavors and textures:
Refrigerated pizza dough forms the foundation of this recipe. Its slightly chewy, bread-like quality creates the perfect vessel for the filling while developing a golden, slightly crisp exterior when baked. The convenience of pre-made dough cannot be overstated—it transforms what could be a lengthy process into something accessible for even novice cooks. Look for it in the refrigerated section near the canned biscuits and cookie dough.
Lean ground beef provides the protein-packed base for the filling. Opting for lean (90/10 or 93/7) reduces excess grease that could make the dough soggy, while still providing enough fat for flavor. The fine texture of ground beef allows it to cook quickly and integrate perfectly with the seasonings.
Taco seasoning is the flavor powerhouse that transforms ordinary ground beef into something crave-worthy. Whether you use a store-bought packet for convenience or mix up your own blend (generally consisting of chili powder, cumin, garlic powder, onion powder, oregano, paprika, and a touch of cayenne), this seasoning mix provides that distinctive taco flavor profile everyone loves.
Shredded Mexican-blend cheese does double duty—it adds creamy, melty richness while also helping to bind the filling together. The combination of cheeses typically found in these blends (cheddar, Monterey Jack, asadero, and queso quesadilla) offers both the sharp tang of cheddar and the superior meltability of Monterey Jack. For best results, grate your own cheese rather than using pre-shredded, which contains anti-caking agents that can affect meltability.
The egg wash might seem like a minor detail, but it’s crucial for achieving that beautiful golden-brown crust that makes these sticks so appealing. It creates a slightly glossy exterior that browns beautifully while helping to seal the edges of the dough.
Similarly, the final butter brush after baking elevates these from good to great. This simple step adds a rich flavor to the exterior and keeps the crust from becoming too dry or tough. It’s the kind of small-but-significant touch that distinguishes thoughtful home cooking.

Mastering the Filling: Perfectly Seasoned Taco Meat
The heart of any great Cheesy Taco Stick is its well-seasoned meat filling. While the recipe may seem straightforward, a few chef-inspired techniques can elevate your taco meat from good to exceptional.
Start with a properly heated pan. Before adding your olive oil and beef, allow the skillet to reach medium-high heat. This ensures proper caramelization of the meat, which develops deeper flavor compounds through the Maillard reaction. You’ll know the pan is ready when a drop of water sizzles on contact.
When adding the ground beef, resist the urge to stir immediately. Instead, allow it to form a light crust before breaking it apart with your spatula. This creates textural contrast and flavor development that continuously stirred meat lacks. Break the meat into uniform, bite-sized crumbles—neither too large (which would make the sticks difficult to eat) nor too small (which could result in dry, overcooked meat).
The draining step is non-negotiable for Cheesy Taco Sticks. Excess fat not only adds unnecessary calories but can also make the pizza dough soggy and prevent proper sealing. For extra-lean results, you can even transfer the browned meat to a paper-towel-lined plate and press gently with additional paper towels.
When adding the taco seasoning, sprinkle it evenly over the meat rather than dumping it in one spot. This ensures consistent distribution. The added water serves two purposes: it helps the seasonings permeate the meat more thoroughly, and it creates a slight sauce that coats each piece of beef. Let this mixture simmer until most—but not all—of the liquid evaporates. The remaining moisture helps keep the meat juicy inside the sticks.
The cooling period before assembly is crucial. Hot filling can begin cooking the dough prematurely, making it difficult to work with, and can also cause the cheese to melt too soon. Allow the meat to cool just until it’s no longer steaming—about 5-10 minutes. This also prevents the heat from the filling from melting the cheese before it goes into the oven, which would result in the cheese being overcooked by the time the dough is properly baked.
The Art of Assembly: Rolling and Shaping Cheesy Taco Sticks
Creating perfect Cheesy Taco Sticks requires a bit of technique, but nothing beyond the abilities of even novice home cooks. The process is similar to making a simple stromboli or stuffed bread, and a few key steps ensure success.
Begin with properly prepared dough. Allow refrigerated pizza dough to sit at room temperature for about 15 minutes before trying to unroll it. This slight warming makes it more pliable and less likely to tear. When unrolling, do so gently and on a lightly floured surface to prevent sticking.
The 12×10 inch rectangle doesn’t need to be perfectly precise—approximate dimensions are fine. Rather than struggling to roll the dough exactly to size, focus on creating an even thickness throughout. If the dough springs back while you’re trying to shape it, let it rest for a few minutes to allow the gluten to relax before trying again.
When adding your filling, leave a 1-inch border around all edges. This margin allows for proper sealing and prevents filling from escaping during baking. Distribute the meat mixture down the center third of the rectangle, creating a compact, even layer rather than a loose pile. The cheese should be sprinkled directly over the meat, not extending beyond it onto the bare dough.
The folding technique is critical for structural integrity. Rather than rolling the dough like a cinnamon roll, you’re creating a long, sealed packet. Fold the two long sides of the dough over the filling so they slightly overlap in the center, creating a secure seam. Pinch this seam firmly to seal, then also pinch the short ends closed. For extra security, you can tuck these pinched ends under the log.
When transferring to the baking sheet, position the log seam-side down. This weight helps further seal the seam during baking. If you choose to create decorative slits on top, be careful not to cut too deeply—you want to score the surface, not cut through to the filling.
For the most attractive presentation, make sure your egg wash covers the entire exposed surface of the dough. Use a silicone brush for easy application and ensure there are no pools of egg wash, which can create unevenly browned spots.
Baking Tips for Golden Perfection
The difference between good and great Cheesy Taco Sticks often comes down to the baking process. With a few professional tips, you can achieve bakery-quality results in your home kitchen.
First, don’t skip the preheat. Your oven needs to be fully at temperature before the sticks go in—this initial blast of heat is crucial for proper rising and browning of the dough. Positioning your rack in the center of the oven ensures even heat distribution.
The parchment paper or silicone mat serves multiple purposes. Beyond making cleanup easier, these surfaces provide insulation to prevent the bottom of your sticks from browning too quickly before the top is done. They also eliminate the need for greasing the pan, which could add unwanted oil to the already rich sticks.
Watch your Cheesy Taco Sticks carefully during the final few minutes of baking. The ideal color is a rich golden brown, not pale (which would indicate underbaking) or dark brown (which suggests the sticks might be dry inside). If your sticks are browning too quickly but don’t seem done, cover them loosely with aluminum foil for the remaining bake time.
The internal temperature of fully baked Cheesy Taco Sticks should reach about 165°F if you’re checking with a meat thermometer. More practically, look for these visual cues: the dough should be puffed and set, with no doughy-looking spots, and you may see slight bubbling of cheese or sauce at any vents or seams.
The butter brushing step immediately after removing from the oven is more than just a flavor enhancement—it also helps soften the crust slightly for a more pleasant texture. Use real butter if possible, as it contains milk solids that add flavor complexity that margarine lacks.
The brief resting period allows the internal steam to settle and the structure to firm up slightly. Cutting too soon can cause the cheese to ooze out excessively. After resting, use a serrated knife and a gentle sawing motion to slice without compressing the sticks.

Serving Suggestions and Dipping Options
Cheesy Taco Sticks are at their absolute best when served with an array of complementary dips and garnishes. This interactive element transforms them from a simple appetizer into a customizable experience that guests love.
Salsa is perhaps the most natural pairing. A fresh, chunky pico de gallo provides bright acidity and crunch that balances the rich, savory sticks. For a more complex flavor profile, offer both a traditional red salsa and a tangy salsa verde made with tomatillos.
Sour cream provides cooling relief, especially if your taco seasoning packs some heat. For an elevated twist, stir in a bit of lime zest and chopped cilantro to create a more sophisticated crema. Greek yogurt can be substituted for a lighter, tangier alternative with similar cooling properties.
Guacamole adds creamy richness and healthy fats that complement the flavors perfectly. Make it fresh if possible, but even store-bought will work in a pinch. For a shortcut version, mash ripe avocado with a squeeze of lime juice, salt, and a spoonful of your favorite salsa.
For heat enthusiasts, sliced jalapeños or a bottle of hot sauce allow for personalized spice levels. Pickled jalapeños offer heat with tangy complexity, while fresh ones provide a crisp, green punch of spice. Consider offering several hot sauce options with varying heat levels.
A simple garnish of fresh chopped cilantro adds color and a burst of herbal freshness that cuts through the richness. For guests who dislike cilantro (due to the well-documented genetic soap-taste phenomenon), offer chopped green onions as an alternative.
For a festive presentation, arrange your Cheesy Taco Sticks on a large wooden board or platter, surrounded by small bowls of various dipping options. This encourages guests to try different combinations and creates an attractive, abundant display that invites sharing.
Variations on Cheesy Taco Sticks
The basic Cheesy Taco Sticks recipe is a fantastic starting point, but part of its charm lies in its adaptability. Here are some creative variations to keep this recipe in regular rotation without boring your taste buds:
For a leaner option, ground turkey or chicken can replace beef with minimal recipe adjustments. Simply add a tablespoon of olive oil when browning to compensate for the lower fat content, and consider bumping up the seasoning slightly as these lighter meats can be more subtle in flavor.
Vegetarian Cheesy Taco Sticks can be made using plant-based ground meat alternatives, or a mixture of black beans and corn that’s been lightly sautéed with taco seasoning. For texture, add finely chopped bell peppers and onions to the mix.
Breakfast-inspired Cheesy Taco Sticks transform morning flavors into handhelds by using cooked, crumbled breakfast sausage, scrambled eggs, and cheddar cheese as the filling. Serve with salsa and avocado for a grab-and-go morning meal.
For a twist on traditional pizza flavors, try Italian-style sticks filled with browned Italian sausage, marinara sauce, mozzarella, and a sprinkle of Italian herbs. Serve with extra marinara for dipping.
Spice enthusiasts can kick up the heat by adding diced jalapeños or a few dashes of hot sauce to the meat mixture. For a smoky heat variation, stir in a half teaspoon of chipotle powder or a tablespoon of finely chopped chipotle peppers in adobo sauce.
For a cheese-lover’s dream, experiment with different cheese combinations beyond the standard Mexican blend. Pepper jack adds a nice heat, while a touch of crumbled queso fresco brings authentic Mexican flavor. For maximum meltability, include some American or Velveeta in your blend.
The shape can also be varied. Instead of making one large log, divide the dough and filling to create individual hand pies or empanada-style pouches. Alternatively, press the dough into a rectangle, add toppings, and cut into strips before baking for more of a flatbread approach.
Cheesy Taco Sticks for Special Diets
One of the strengths of this versatile recipe is how easily it can be adapted for various dietary needs without sacrificing flavor or texture.
For gluten-free diets, substitute the traditional pizza dough with a gluten-free alternative, now widely available in many grocery stores. Alternatively, you can use gluten-free crescent roll dough as a substitute. Just be sure to verify that your taco seasoning is also gluten-free, as some commercial blends contain wheat-based fillers.
To accommodate dairy-free needs, plant-based cheese substitutes have come a long way in recent years, particularly those designed specifically for melting. Brands like Violife, Follow Your Heart, and Daiya all offer Mexican-style shreds that melt reasonably well. Brush the exterior with olive oil instead of butter after baking for a similar effect.
For keto or low-carb adaptations, consider using a fathead dough made with almond flour, mozzarella, cream cheese, and eggs. This creates a surprisingly bread-like texture with a fraction of the carbs. You’ll need to adjust the baking temperature to 375°F and watch carefully as this dough browns more quickly.
Those following a paleo diet might enjoy a sweet potato dough variation. Combine mashed sweet potato with almond flour, eggs, and a touch of arrowroot powder to create a workable dough. The slight sweetness complements the savory filling beautifully.
For lower-sodium diets, make your own taco seasoning without salt, and choose low-sodium cheese options. The flavor profile remains robust thanks to the herbs and spices, even with reduced sodium.
Weight Watchers followers can lighten up these sticks by using 99% fat-free ground turkey, fat-free Greek yogurt instead of sour cream for dipping, and reduced-fat cheese. Using less cheese overall and adding more vegetables to the filling also reduces points while maintaining satisfaction.

Storage, Freezing, and Reheating
One of the many virtues of Cheesy Taco Sticks is their make-ahead potential, allowing you to prepare now and enjoy later with minimal effort.
For short-term storage, completely cooled Cheesy Taco Sticks can be refrigerated in an airtight container for up to 3 days. Separate layers with parchment paper to prevent sticking. The flavor often improves after a day as the seasonings have more time to meld.
Freezing is an excellent option for longer storage. For best results, freeze the assembled but unbaked sticks. Prepare the recipe through the egg wash step, then freeze on a baking sheet until solid before transferring to a freezer bag. Label with the date and baking instructions, noting that frozen sticks will need an additional 8-10 minutes of baking time. These will keep for up to 3 months.
Alternatively, you can freeze fully baked and cooled sticks. Wrap individual or small bundles in plastic wrap, then aluminum foil, before placing in a freezer bag. This double-wrapping prevents freezer burn and preserves texture. Frozen baked sticks are best used within 1-2 months.
When reheating refrigerated sticks, the oven is your best friend. Preheat to 350°F and warm the sticks for 8-10 minutes until heated through. This method restores the crisp exterior better than microwave reheating, which tends to make the dough soggy or tough.
For reheating frozen baked sticks, you have two options. Thaw overnight in the refrigerator and then reheat as above, or reheat directly from frozen in a 350°F oven for about 15-20 minutes, covering with foil for the first half of heating to prevent over-browning.
Microwave reheating is possible in a pinch but not ideal. Wrap the stick in a paper towel and heat on 50% power in 30-second intervals until just warmed through. The texture won’t be as good as oven-reheated, but the flavor will still satisfy.
Frequently Asked Questions About Cheesy Taco Sticks
Can I make Cheesy Taco Sticks ahead of time? Absolutely! You can prepare them completely up to the point of baking, cover and refrigerate for up to 24 hours, then bake when needed. Add 3-5 minutes to the baking time if cooking directly from the refrigerator. Alternatively, you can bake them completely, refrigerate, and reheat at 350°F for 8-10 minutes when ready to serve.
My dough keeps tearing during rolling—what am I doing wrong? Cold dough tends to be less pliable and more prone to tearing. Allow your refrigerated dough to rest at room temperature for 15-20 minutes before working with it. If it’s still tearing, let it rest another 5 minutes to allow the gluten to relax. Also ensure your work surface is lightly floured to prevent sticking.
Can I use different meats for the filling? Definitely! Ground turkey, chicken, or plant-based meat alternatives all work well. Just be aware that leaner meats may need a touch more oil when browning and perhaps slightly more seasoning for comparable flavor intensity.
The cheese is leaking out during baking—how do I prevent this? Make sure your seams are well-sealed before baking. Pinch firmly and consider using a fork to crimp the edges for extra security. Also, don’t overfill—keep the filling centered with a good margin around the edges. If some cheese does leak, don’t worry! Those crispy cheese bits are often the most sought-after bites.
My sticks turned out soggy on the bottom—what happened? This usually results from excess moisture in the filling. Make sure to drain the beef well after browning, and let the seasoned meat mixture simmer until most of the liquid has evaporated. Also, cooling the filling before assembly prevents condensation inside the dough packet.
More Related Recipes You Might Enjoy
If you’re a fan of these Cheesy Taco Sticks, you’ll love these other crowd-pleasing recipes that share similar flavors, ingredients, or cooking techniques:
Sweet Tooth Treats offers the perfect dessert follow-up to your savory Cheesy Taco Sticks. After enjoying the bold, spicy flavors of your taco sticks, these sweet treats provide the perfect contrast to round out your meal experience.
Healthy Bites Meal Prep provides lighter options that use similar ingredients to Cheesy Taco Sticks but with a nutritional focus. Learn how to incorporate taco-seasoned proteins into make-ahead meals that support your health goals while satisfying those Mexican flavor cravings.
Satisfying Snacks & Appetizers features a collection of finger foods that would pair perfectly with Cheesy Taco Sticks for an impressive appetizer spread. This resource is invaluable when planning game day gatherings or potluck contributions where you want to offer a variety of hand-held options.
Cheesy Taco Sticks: A Crowd-Pleasing Conclusion
There’s something undeniably special about recipes that bridge culinary traditions, and these Cheesy Taco Sticks do exactly that. By merging the beloved flavors of Mexican-inspired tacos with the convenient format of Italian-style breadsticks, this dish creates something greater than the sum of its parts—a versatile, crowd-pleasing food that works equally well as an appetizer, main dish, or anytime snack.
What makes Cheesy Taco Sticks particularly valuable is their accessibility. Using straightforward ingredients available at any supermarket and requiring no special equipment or techniques, they’re approachable for cooks of all skill levels. Yet the results impress like something far more complex, delivering that magical combination of crisp exterior, tender interior, seasoned meat, and melty cheese that appeals to almost everyone.
Whether you’re feeding a family with diverse preferences, contributing to a potluck, or hosting a game day gathering, these Cheesy Taco Sticks offer a solution that’s both practical and delicious. Their make-ahead potential makes them especially valuable for busy households, while their endless adaptability ensures they’ll never become boring.
So the next time you’re faced with the eternal dinner question or need a reliable crowd-pleaser, remember these Cheesy Taco Sticks. With minimal effort and maximum flavor, they’re bound to become a regular in your cooking rotation—and a frequent request from family and friends alike.
Print
Cheesy Taco Sticks: 7 Amazing Secrets for Ultimate Game Day Treats
- Total Time: 40 minutes
- Yield: 8–10 sticks (serves 4–5 as a main dish, 8–10 as an appetizer) 1x
Description
These Cheesy Taco Sticks are what happen when taco night meets game day appetizers! Golden-brown pizza dough wrapped around seasoned taco beef and gooey cheese creates the ultimate hand-held crowd-pleaser. Perfect for busy weeknights, game day gatherings, or anytime you’re craving Mexican flavors in a fun, dippable form. Trust me, folks—you’ll want to make a double batch because these disappear faster than you can say “touchdown!”
Ingredients
For the Filling:
- 1 lb lean ground beef
- 1 packet taco seasoning (or about 2 Tbsp homemade blend)
- ½ cup water
- 1 ½ cups shredded Mexican-blend cheese (cheddar, Monterey Jack, etc.)
- 1 Tbsp olive oil (for sautéing)
For Assembly:
- 1 (13.8-oz) package refrigerated pizza dough
- 1 egg, beaten (for egg wash)
- 1 Tbsp melted butter or margarine
Optional Garnishes:
- Chopped cilantro
- Sour cream
- Salsa
- Sliced jalapeños
Instructions
- Preheat & Prep: Preheat your oven to 400°F (200°C) and line a baking sheet with parchment paper or a silicone mat.
- Brown the Beef: In a large skillet over medium-high heat, add the olive oil. Cook ground beef, breaking it up with a spatula, until no pink remains—about 5–7 minutes. Drain any excess fat.
- Season It Up: Sprinkle the taco seasoning over the browned beef, pour in ½ cup water, and stir well. Let simmer until the liquid’s mostly evaporated, about 2–3 minutes. Taste and adjust the seasoning if needed. Set aside to cool slightly.
- Roll & Fill the Dough: Unroll pizza dough onto a lightly floured surface. Gently press into a rough rectangle, about 12×10 inches. Evenly spread the cooked taco beef down the center lengthwise, then sprinkle the shredded cheese on top of the meat.
- Seal & Shape: Fold one long side of dough over the filling, then fold the opposite side to meet it, pinching the seam to seal. For a fancier look, use kitchen shears to snip small slits along the top seam.
- Egg Wash & Bake: Transfer the log to your prepared sheet, seam-side down. Brush the top with beaten egg for a golden finish. Bake until puffed and golden, about 15–18 minutes.
- Butter & Serve: As soon as it comes out of the oven, brush with melted butter to keep it soft and flavorful. Let rest for 2 minutes, then slice into 8–10 sticks.
- Family-Style Finishing Touches: Serve warm with small bowls of salsa, sour cream, and fresh cilantro for dipping and garnishing.
Notes
- For extra-crispy edges, try baking on a preheated pizza stone instead of a baking sheet.
- Make ahead option: Assemble completely, cover with plastic wrap, and refrigerate for up to 24 hours before baking.
- Freezer-friendly! After assembly (but before egg wash), freeze solid, then wrap tightly. When ready to bake, thaw overnight in refrigerator, apply egg wash, and add 5-7 minutes to baking time.
- Spice it up by adding a small can of diced green chiles or jalapeños to the beef mixture.
- Got leftovers? Reheat in a 350°F oven for 5-7 minutes to restore that freshly-baked texture.
- Prep Time: 15 minutes
- Cook Time: 25 minutes
- Category: Appetizer, Main Dish
- Method: Baked
- Cuisine: Mexican-American Fusion
Nutrition
- Serving Size: 1 stick (based on 10 servings)
- Calories: 245
- Sugar: 1g
- Sodium: 480mg
- Fat: 12g
- Saturated Fat: 5g
- Unsaturated Fat: 6g
- Trans Fat: 0g
- Carbohydrates: 18g
- Fiber: 1g
- Protein: 15g
- Cholesterol: 55mg