These adorable Witch Hat Chocolate Cookies combine rich chocolate cookies with chocolate kiss “hats” to create a festive Halloween treat that’s as fun to make as it is to eat. Perfect for parties, classroom treats, or a special October surprise!
Introduction: The Magic Behind Witch Hat Chocolate Cookies
When Halloween season arrives, there’s nothing quite like filling your home with the aroma of freshly baked treats. These Witch Hat Chocolate Cookies cast a particularly delicious spell, combining soft chocolate cookies with pointed chocolate kiss hats to create a whimsical treat that captures the Halloween spirit perfectly. The deep chocolate flavor paired with the decorative icing “hatbands” makes these cookies not just tasty, but visually enchanting as well.
Witch Hat Chocolate Cookies have become a Halloween staple in many households for good reason. They’re surprisingly simple to make but deliver that “wow” factor when arranged on a Halloween party table. Children light up at the sight of these playful treats, and adults appreciate the rich, not-too-sweet chocolate flavor that sets them apart from store-bought alternatives.
What makes these Witch Hat Chocolate Cookies truly special is their versatility. While they’re designed for Halloween festivities, the basic chocolate cookie recipe creates such a perfect texture—slightly crisp on the outside while remaining soft and chewy inside—that it might become your go-to chocolate cookie base for other occasions. The dough comes together quickly, requires no chilling time, and creates a wonderful canvas for the chocolate kiss hats.
In this comprehensive guide, I’ll walk you through every step of creating these spellbinding treats, from selecting the best ingredients to troubleshooting common issues. Whether you’re an experienced baker or trying a special Halloween recipe for the first time, you’ll find these Witch Hat Chocolate Cookies to be a bewitchingly delicious addition to your seasonal repertoire.
Essential Ingredients for Perfect Witch Hat Chocolate Cookies
The Cookie Base: Creating the Perfect Chocolate Foundation
The magic of these cookies starts with a perfectly balanced chocolate base that’s substantial enough to support the chocolate kiss hat without being too heavy or dry. Here’s what you’ll need:
All-purpose flour (1¾ cups): Provides the structure for your cookies. For the most accurate measurement, spoon the flour into your measuring cup and level it off with a knife rather than scooping directly from the bag, which can compact the flour and result in too much.
Unsweetened cocoa powder (½ cup): This is where the deep chocolate flavor comes from! Choose a high-quality cocoa powder for the richest taste. Dutch-processed cocoa creates a smoother, less acidic flavor, while natural cocoa offers a more intense chocolate punch.
Baking powder (1 teaspoon): Provides just enough lift to keep the cookies from being too dense without making them cakey.
Kosher salt (½ teaspoon): Don’t skip this! Salt enhances the chocolate flavor and balances the sweetness. If using table salt instead of kosher, reduce to ¼ teaspoon.
Butter (¾ cup/1½ sticks): Make sure it’s truly at room temperature—you should be able to press your finger into it easily but it shouldn’t be melting. This allows proper creaming with the sugars for that perfect cookie texture.
Granulated sugar (1 cup) and light brown sugar (½ cup, packed): This combination creates depth of flavor while providing the right texture. The brown sugar adds moisture and a subtle molasses note that complements the chocolate beautifully.
Egg (1 large): Brings the dough together and adds structure. Room temperature eggs incorporate more evenly into the batter.
Vanilla extract (1 teaspoon): Even in chocolate cookies, vanilla enhances the overall flavor profile. Use pure vanilla extract rather than imitation for the best taste.
The Decorative Elements: Turning Cookies into Witch Hats
What transforms these chocolate cookies from ordinary to extraordinary are the decorative elements that create the witch hat effect:
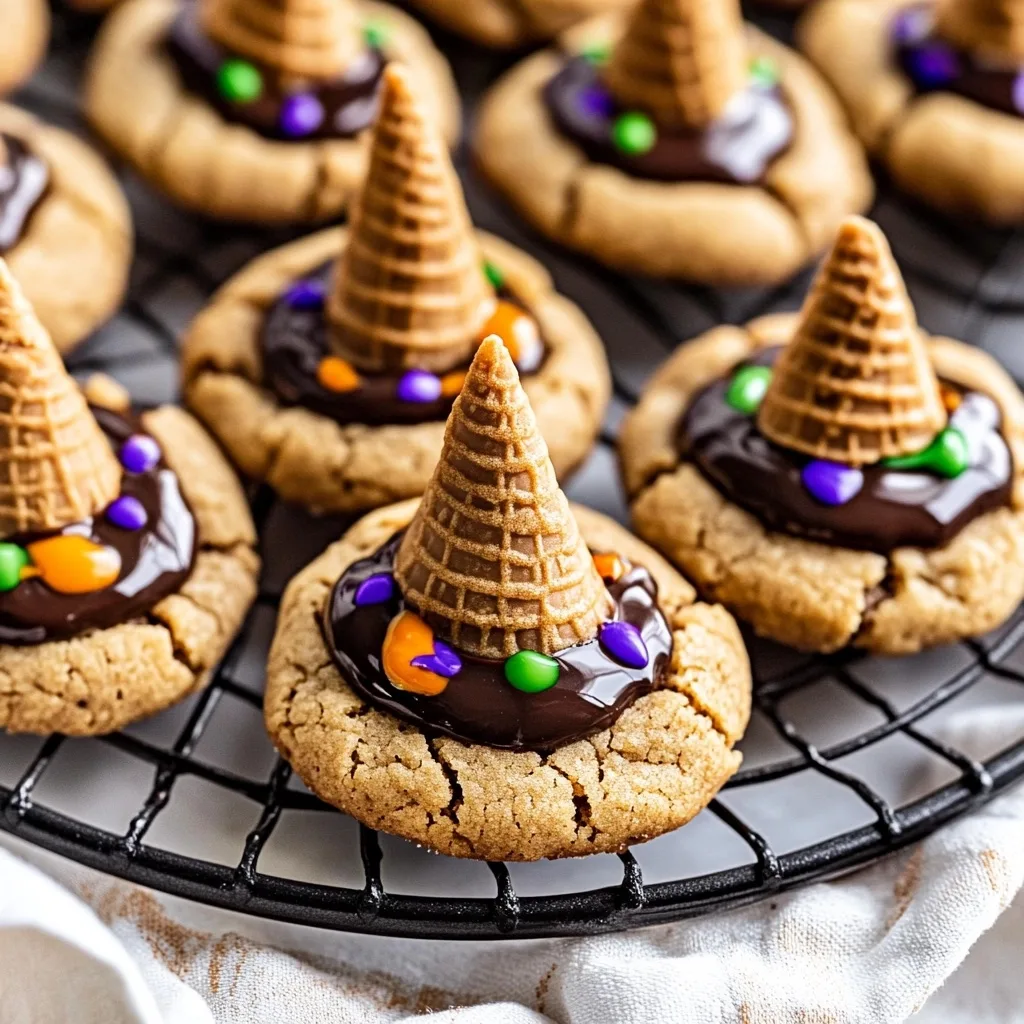
Chocolate “kisses” or cones (about 48): Hershey’s Kisses are the classic choice, but Wilton chocolate cones or other pointed chocolate candies work beautifully as well. Unwrap them before your cookies come out of the oven so you’re ready for the critical moment.
Decorating icing (orange or green): This creates the “hatband” that adds that final festive touch. Store-bought decorating tubes make this easy, but you can also make your own by mixing powdered sugar, a tiny bit of milk, and food coloring to your desired consistency and color.
For an extra special twist, consider these optional additions:
- A sprinkle of edible glitter over the icing while it’s still wet for “magical” sparkle
- Tiny candy decorations attached to the hatbands for added detail
- A dusting of powdered sugar “magic dust” around the cookies when serving
Quality ingredients make all the difference in these Witch Hat Chocolate Cookies. The rich chocolate flavor of the cookie paired with the sweet chocolate topper creates a balanced treat that appeals to both children and adults alike.

Step-by-Step Instructions: Crafting Your Witch Hat Chocolate Cookies
Preparation: Setting the Stage for Baking Success
Before diving into the mixing and baking, proper preparation ensures your Witch Hat Chocolate Cookies turn out perfectly:
- Preheat your oven to 350°F (175°C). Allow at least 15 minutes for your oven to reach the correct temperature. An oven thermometer can be helpful, as many ovens run hotter or cooler than their settings indicate.
- Line two baking sheets with parchment paper or silicone baking mats. This prevents sticking and makes cleanup easier. If you don’t have either, you can lightly grease the baking sheets, but parchment or silicone will give you the best results.
- Set out all ingredients before beginning. Having everything measured and ready (what chefs call “mise en place”) makes the process smoother and helps ensure you don’t forget anything.
- Unwrap your chocolate kisses or prepare your chocolate cones. You’ll need to work quickly when the cookies come out of the oven, so having these ready is essential.
Mixing the Cookie Dough: Creating the Perfect Texture
Follow these steps to create a dough with the ideal consistency and flavor:
- In a medium bowl, whisk together the flour, cocoa powder, baking powder, and salt. This distributes the leavening and salt evenly throughout the dry ingredients.
- In a large bowl, beat the room-temperature butter, granulated sugar, and brown sugar on medium speed for 2-3 minutes. Don’t rush this step! Proper creaming incorporates air into the mixture, creating small pockets that expand during baking for the right texture. The mixture should become noticeably lighter in both color and texture.
- Add the egg and vanilla extract, beating just until combined. Overbeating after adding eggs can make cookies tough. Scrape down the sides of the bowl with a rubber spatula to ensure everything is evenly incorporated.
- Gradually add the dry ingredients to the butter mixture on low speed. Add about one-third at a time, mixing just until each addition disappears. Stop when you no longer see streaks of flour but before the dough becomes sticky. Overmixing at this stage develops too much gluten, resulting in tough cookies.
The finished dough should be soft but not sticky, deeply chocolatey in color, and easy to scoop. If it seems too soft, refrigerate for 15-20 minutes before proceeding.
Baking and Decorating: The Transformation into Witch Hats
Now comes the magical part—transforming your chocolate dough into charming witch hats:
- Using a teaspoon or small cookie scoop, drop approximately 1 tablespoon portions of dough onto your prepared sheets. Space them about 2 inches apart to allow for spreading. For uniform cookies, use a cookie scoop with a release mechanism.
- Bake for 8-10 minutes, rotating pans halfway through. The cookies are done when the edges are set but the centers still appear slightly soft. Don’t overbake! They’ll continue firming up on the hot baking sheet after removal from the oven.
- Immediately press a chocolate kiss or cone into the center of each warm cookie. The heat from the cookie will slightly melt the bottom of the chocolate, helping it adhere. Hold for just a few seconds until it feels secure.
- Allow the cookies to cool on the baking sheet for 5 minutes before transferring to a wire rack to cool completely. Moving them too soon can cause them to break or lose their chocolate toppers.
- Once completely cool, pipe a small band of orange or green icing around the base of each chocolate peak. This creates the witch’s hatband and completes the visual effect. Allow the icing to set before stacking or storing.
The timing is crucial when adding the chocolate kisses—too soon (while the cookies are still in the oven) and they’ll melt completely; too late (after the cookies have cooled) and they won’t adhere properly. That perfect moment comes just as the cookies emerge from the oven.
Tips and Tricks for Witch Hat Chocolate Cookie Success
Troubleshooting Common Issues
Even experienced bakers sometimes encounter challenges. Here’s how to address common Witch Hat Chocolate Cookie problems:
Cookies spreading too much? Your butter might have been too warm or you may have used too little flour. Next time, make sure your butter is cool room temperature (not soft and melty), and measure your flour carefully. You can also chill the dough for 30 minutes before baking.
Chocolate kisses falling off? Press them into the cookies immediately after removing from the oven, while still very hot. Hold for a few seconds longer to ensure adhesion. If they’re still problematic, you can add a tiny dab of melted chocolate to the bottom of each kiss before pressing it onto the cookie.
Icing too runny or too stiff? For piping, the icing should hold its shape but flow smoothly. If too runny, add more powdered sugar; if too stiff, add a drop of water at a time until you reach the right consistency.
Cookies too dry? You likely overbaked them. For these cookies, it’s better to slightly underbake than overbake. They should look almost underdone in the center when you remove them from the oven.
Variations and Creative Twists
While the classic Witch Hat Chocolate Cookies are delightful on their own, consider these variations to make them your own:
Flavor variations:
- Add ½ teaspoon of espresso powder to the dry ingredients to enhance the chocolate flavor
- Mix in ½ teaspoon of cinnamon for a Mexican chocolate twist
- Substitute almond extract for vanilla for a sophisticated flavor profile
Decorative options:
- Use black icing for the hatband with tiny candy sprinkles for a spookier look
- Try purple icing with silver dragées for a magical wizard hat variation
- Create multicolored hatbands with alternating colors for extra festive flair
Seasonal adaptations:
- Transform them into holiday “elf hats” with red and green hatbands
- Make graduation caps with square chocolate pieces and colored tassels
- Create winter “gnome hats” with red hatbands and a tiny white sprinkle “pompom”
Remember that the cookie base itself is fantastic for any chocolate cookie need, not just witch hats. It makes an excellent standalone chocolate cookie or base for other decorated treats year-round.

Make-Ahead and Storage Recommendations
These Witch Hat Chocolate Cookies are perfect for planning ahead:
Cookie dough preparation: The dough can be made up to 3 days in advance and refrigerated. Bring to room temperature before scooping and baking. You can also freeze portioned dough balls for up to 3 months—just add 1-2 minutes to the baking time when baking from frozen.
Storage of finished cookies: Store in an airtight container at room temperature for up to 4 days. Place wax paper between layers to prevent the chocolate kisses from sticking to the cookies above them.
Freezing completed cookies: While you can freeze the finished cookies, the decorative icing may not look as crisp after thawing. For best results, freeze the cookies with the chocolate kisses attached but add the decorative icing after thawing.
Transport tips: When taking these to a party or school event, place them in a single layer in a shallow container or on a tray. If you must stack them, place a sheet of parchment between layers and transport them in a cool vehicle to prevent the chocolate kisses from softening too much.
Serving Suggestions and Party Presentation
Make your Witch Hat Chocolate Cookies the star of your Halloween celebration with these serving ideas:
Halloween party display: Arrange the cookies on a black or orange platter scattered with candy corn or chocolate sprinkles. Add some plastic spiders or other Halloween decorations around the edge for dramatic effect.
Witch’s brew pairing: Serve alongside green punch (lime sherbet and lemon-lime soda) labeled as “Witch’s Brew” for a thematic drink pairing.
Dessert table centerpiece: Create a tiered stand with Witch Hat Chocolate Cookies on the top tier, surrounded by other Halloween treats on lower tiers for a stunning visual display.
Cookie gift packages: Place 3-4 cookies in a cellophane bag tied with orange and black ribbon for a sweet take-home treat for party guests or neighbors.
School celebration presentation: For classroom parties, place each cookie in a cupcake liner for easy handling by little fingers and arrange on a tray decorated with Halloween stickers or cutouts.
The visual impact of these cookies makes them perfect for Instagram-worthy photos, so don’t forget to snap a picture before they disappear—which they will, quickly!

Nutritional Information and Dietary Considerations
Each Witch Hat Chocolate Cookie contains approximately:
- 120-130 calories
- 6g fat (3.5g saturated)
- 17g carbohydrates
- 9g sugar
- 2g protein
Allergen information: These cookies contain wheat (flour), dairy (butter), and eggs. The chocolate kisses typically contain milk products as well. Always check specific chocolate product ingredients for potential allergens like soy or nut traces.
Dietary adaptations:
- Gluten-free version: Substitute a 1:1 gluten-free flour blend for the all-purpose flour. Add ¼ teaspoon xanthan gum if your blend doesn’t include it already.
- Dairy-free option: Use plant-based butter alternative and dairy-free chocolate pieces (several specialty brands make kiss-shaped dairy-free chocolates).
- Egg-free adaptation: Replace the egg with a flax egg (1 tablespoon ground flaxseed mixed with 3 tablespoons water, allowed to sit for 5 minutes before using).
While these cookies are a treat and should be enjoyed as such, the portion size is reasonable, and they’re made with simple, recognizable ingredients rather than the preservatives and artificial flavors found in many store-bought Halloween treats.
Frequently Asked Questions About Witch Hat Chocolate Cookies
Q: Can I make these Witch Hat Chocolate Cookies ahead of time for a party? A: Absolutely! You can make the cookies up to 3 days ahead and store them in an airtight container at room temperature. For the freshest taste, consider baking the cookies and attaching the chocolate kisses 1-2 days before, then adding the decorative icing the day of your event.
Q: My chocolate kisses are melting too much when I put them on the cookies. What am I doing wrong? A: The cookies might be too hot. Try letting them cool for 1-2 minutes after removing from the oven before adding the kisses. The cookies should still be warm enough to slightly melt the bottom of the kiss but not so hot that they cause complete melting.
Q: Can I use natural cocoa powder instead of Dutch-processed? A: Yes! This recipe works with either type. Natural cocoa will give a slightly more acidic, intense chocolate flavor, while Dutch-processed offers a smoother, milder taste. Both will create delicious cookies, so use what you have on hand.
Q: How do I get the decorative icing to look neat and professional? A: For the cleanest lines, use a piping bag with a small round tip. If you don’t have piping equipment, place your icing in a small zip-top bag and snip off the tiniest corner. Practice your technique on a piece of parchment paper first. If you make a mistake on a cookie, quickly wipe it off with a clean, damp paintbrush before the icing sets.
Q: Why did my cookies spread too much during baking? A: There are several possible causes: your butter might have been too warm, you might have used too little flour, or your baking sheets might have been warm from a previous batch. Make sure your measurements are accurate, your butter is room temperature but not soft and melty, and always start with cool baking sheets.
Q: Can I freeze these cookies for later use? A: Yes! The cookies freeze well for up to 3 months. For best results, freeze them with the chocolate kisses attached but add the decorative icing after thawing. Store them in an airtight container with parchment paper between layers.
Why Witch Hat Chocolate Cookies Are the Perfect Halloween Treat
There’s something truly special about Witch Hat Chocolate Cookies that makes them stand out among Halloween treats. Unlike store-bought options, these homemade delights bring warmth and personal touch to your celebration. The rich chocolate cookie base offers sophisticated flavor that appeals to all ages, while the whimsical appearance captures the playful spirit of Halloween.
What makes these cookies particularly magical is how they transform a simple chocolate cookie into something extraordinary with just a few special touches. The chocolate kiss “hats” and colorful icing “hatbands” create a visual impact that far exceeds the actual effort required. They’re the perfect balance of impressive and achievable—even baking beginners can create a batch that looks like it came from a specialty bakery.
Beyond their charming appearance, these cookies create moments and memories. Children delight in helping decorate them, party guests smile at the creative presentation, and the ritual of baking them can become a treasured part of your family’s Halloween traditions. Food has always been a way to connect and celebrate, and these Witch Hat Chocolate Cookies embody that spirit perfectly.
So heat up your oven, gather your ingredients, and prepare to cast a delicious spell with these enchanting Witch Hat Chocolate Cookies. Whether shared at a festive gathering, packaged as gifts, or enjoyed with your family alongside mugs of warm apple cider, they’re sure to become a beloved part of your Halloween celebration.
More Related Recipes You Might Enjoy
If you enjoyed these Witch Hat Chocolate Cookies, you might also love these festive treats:
- Sweet Potato Ghost Pancakes – Another playful Halloween breakfast treat that combines nutritious sweet potatoes with spooky presentation.
- Watermelon Sorbet – A refreshing palate cleanser that would pair beautifully with rich chocolate cookies for a balanced dessert spread.
- Grilled Peach Sundae – When summer transitions to fall, this grilled dessert offers the same creative presentation style as our Witch Hat Chocolate Cookies with seasonal fruit.
Each of these recipes shares the same attention to visual presentation and flavor balance that makes our Witch Hat Chocolate Cookies so special. Whether you’re planning a complete Halloween menu or looking for year-round treats that delight the eye as much as the palate, these options are sure to impress.
Print
Witch Hat Chocolate Cookies: 10 Amazing Tips for Perfect Results
- Total Time: 30 minutes
- Yield: 48 cookies 1x
- Diet: Vegetarian
Description
These adorable Witch Hat Chocolate Cookies combine rich chocolate cookies with chocolate kiss “hats” to create a festive Halloween treat that’s perfect for parties, classroom events, or a special October surprise. The soft chocolate cookie base is topped with chocolate frosting and a pointed sugar cone to create the witch hat effect, finished with colorful icing “hatbands.”
Ingredients
- 1¾ cups all-purpose flour
- ½ cup unsweetened cocoa powder
- 1 teaspoon baking powder
- ½ teaspoon kosher salt
- ¾ cup (1½ sticks) unsalted butter, room temp
- 1 cup granulated sugar
- ½ cup light brown sugar, packed
- 1 large egg, room temp
- 1 teaspoon pure vanilla extract
- About 48 chocolate “kisses” or small chocolate cones (like Hershey’s Kisses or Wilton candy cones)
- Orange or green decorating icing (for “hat bands”)
Instructions
- Preheat your oven to 350°F (175°C). Line two baking sheets with parchment paper or silicone baking mats.
- In a medium bowl, whisk together the flour, cocoa powder, baking powder, and salt. Set aside.
- In a large bowl, beat the room-temp butter, granulated sugar, and brown sugar on medium speed until light and fluffy—about 2–3 minutes.
- Crack in your egg and splash in the vanilla extract. Beat until just combined, scraping down the sides once or twice.
- Gradually add your dry ingredients to the butter mixture on low speed, mixing until you’ve got a soft, chocolatey dough. Don’t overmix—just until no streaks of flour remain.
- Using a teaspoon or small cookie scoop, drop about 1 tablespoon of dough onto your prepared sheets, spacing them about 2 inches apart.
- Bake for 8–10 minutes, until the edges are set but the centers are still a tad soft.
- As soon as they come out of the oven, carefully press a chocolate kiss or cone into the center of each warm cookie. Hold for a few seconds so the chocolate adheres.
- Once cookies are completely cool, pipe a little band of orange or green icing around the base of each chocolate peak to create the witch’s hatband.
Notes
- For best results, make sure your butter is at true room temperature but not melting.
- If your chocolate kisses are falling off, press them into the cookies immediately after removing from the oven and hold for a few seconds longer.
- Store in an airtight container at room temperature for up to 4 days, placing wax paper between layers to prevent sticking.
- The dough can be frozen for up to 3 months. Thaw in the refrigerator before baking.
- Prep Time: 20 minutes
- Cook Time: 10 minutes
- Category: Dessert
- Method: Baking
- Cuisine: American
Nutrition
- Serving Size: 1 cookie
- Calories: 125
- Sugar: 9g
- Sodium: 45mg
- Fat: 6g
- Saturated Fat: 3.5g
- Unsaturated Fat: 2g
- Trans Fat: 0g
- Carbohydrates: 17g
- Fiber: 1g
- Protein: 2g
- Cholesterol: 15mg