When Halloween season rolls around, nothing captures the spooky spirit quite like a themed dessert that’s both delicious and visually striking. The Haunted Oreo Graveyard Cake stands out as the perfect centerpiece for your Halloween gathering – a delightfully dark chocolate cake transformed into an eerie cemetery scene that will have your guests simultaneously spooked and reaching for seconds. This showstopper combines rich devil’s food cake with decadent toppings and playful decorations to create a memorable treat that’s as fun to make as it is to eat.
Unlike ordinary chocolate cakes, this Haunted Oreo Graveyard Cake features multiple layers of flavor and texture – from the moist devil’s food base soaked in sweetened condensed milk to the creamy whipped topping “fog” and the crunchy Oreo cookie “dirt.” The creative tombstones and candy decorations take this dessert to the next level, making it not just a cake but a Halloween activity the whole family can enjoy creating together.
In this guide, you’ll learn exactly how to create this spooktacular dessert from start to finish, with expert tips for achieving the perfect texture, creative decoration ideas, and ways to personalize your Haunted Oreo Graveyard Cake to suit your Halloween theme. Let’s dig in (if you dare)!
The Story Behind the Haunted Oreo Graveyard Cake
Halloween desserts have evolved from simple candies and cookies to elaborate themed creations that serve as both treats and decorations. The graveyard cake concept has roots in traditional Halloween celebrations, which have always played with the playful side of spooky imagery. This particular Haunted Oreo Graveyard Cake represents the perfect marriage of a classic poke cake (which gained popularity in the 1970s) with modern Halloween aesthetics and the beloved Oreo cookie.
The nutritional profile of this cake is decidedly indulgent – it’s a special occasion treat that embraces the “trick-or-treat” spirit of Halloween. Devil’s food cake delivers a rich chocolate experience with its deep cocoa flavor, while the sweetened condensed milk infusion ensures incredible moisture. The Oreo cookie crumbles not only create the visual “dirt” effect but also add a satisfying textural contrast to each bite.
What makes this recipe particularly appealing is its versatility and adaptability. You can easily customize the decorations based on what’s available at your local store or what aligns with your specific Halloween theme. Some bakers opt for a zombie-themed graveyard with green-tinted frosting resembling toxic slime, while others create a more classic cemetery with simple tombstones and strategic lighting effects from candles.
The Haunted Oreo Graveyard Cake works so brilliantly because it combines simplicity with dramatic effect. The base recipe is straightforward enough for novice bakers, yet the final presentation looks impressively professional. It’s the perfect conversation starter for Halloween parties, and the interactive decoration process makes it ideal for family baking projects where children can help design their own spooky graveyard scene.
Understanding the Key Ingredients
The Cake Foundation
The foundation of your Haunted Oreo Graveyard Cake is a devil’s food chocolate cake mix. Devil’s food is the perfect choice for this Halloween creation because it produces a cake that’s intensely dark – almost black – which creates the perfect backdrop for your graveyard scene. Devil’s food is characterized by its rich chocolate flavor and moist, tender crumb, typically achieved through a higher ratio of cocoa powder and sometimes coffee as a flavor enhancer.
While the recipe calls for a boxed mix for convenience, the quality can vary between brands. Look for mixes containing real cocoa rather than just chocolate flavoring for the best taste. You’ll need to add the ingredients listed on the box, which typically include eggs, water, and oil. For an even richer result, consider substituting milk for the water called for on the box, or replacing the oil with an equal amount of melted butter.
The 9×13 inch pan size is ideal for this creation as it provides ample surface area for decorating your graveyard scene while keeping the cake at a reasonable thickness for poking and soaking with the sweet milk mixture.
The Decadent Moisture Infusion
What transforms this from a standard chocolate cake to something truly special is the poke cake technique. After baking, you’ll infuse the cake with sweetened condensed milk and hot fudge sauce, which seep into the cake through holes poked throughout the surface.
Sweetened condensed milk is milk that’s had water removed and sugar added, creating a thick, sweet liquid that adds incredible moisture and a subtle caramel note to the cake. It’s important to pour this over the cake while it’s still warm (but not hot) to maximize absorption.
The hot fudge sauce adds another layer of chocolate intensity. Opt for a high-quality jar for the best results – you want a thick, rich sauce rather than a thin syrup. Warming it slightly before pouring makes it easier to spread and helps it penetrate the cake more effectively. Together, these two liquid additions ensure that every bite of your Haunted Oreo Graveyard Cake is incredibly moist and flavorful.
The Creepy Toppings
The visual impact of your Haunted Oreo Graveyard Cake comes from its carefully constructed toppings. The whipped topping layer represents the fog or mist hovering over your graveyard. While the recipe calls for a store-bought option like Cool Whip for convenience, you could substitute homemade whipped cream stabilized with a little gelatin if you prefer a less processed option.
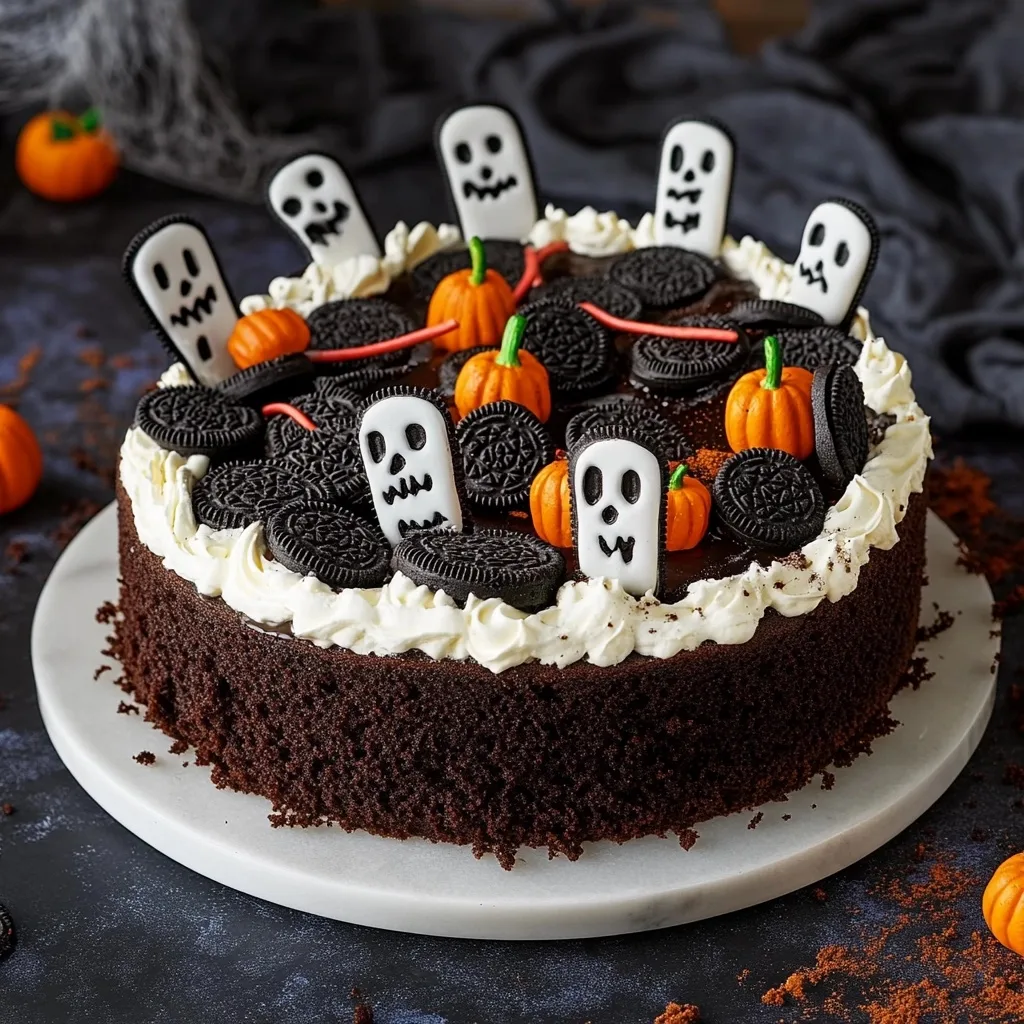
Crushed Oreo cookies create the perfect “dirt” for your graveyard scene. The contrast between the black cookies and white cream filling creates a speckled effect that authentically resembles soil. Regular Oreos work well, but you could also use Double Stuf for more “dirt” volume or even seasonal Halloween Oreos that sometimes feature orange cream centers for an extra festive touch.
Milano cookies make ideal tombstones due to their oval shape and smooth surface that’s perfect for writing on with gel icing. If Milano cookies aren’t available, other oval-shaped cookies like Pepperidge Farm Chessmen or even graham crackers cut into tombstone shapes can work as alternatives.
The Spooky Decorations
The finishing touches bring your Haunted Oreo Graveyard Cake to life (or perhaps more appropriately, to the afterlife). Candy pumpkins (sometimes called mellowcreme pumpkins) add bright orange highlights against the dark “soil.” Gummy worms peeking out from the dirt add a sense of movement and playfulness to the scene. Candy bones, which can be found in specialty baking shops or Halloween candy sections, complete the cemetery vibe.
Black gel icing is essential for writing on your tombstones. Look for a product specifically labeled as edible and designed for detail work. In a pinch, melted chocolate can also work for writing on the cookies, though it won’t provide the same stark contrast as black gel against the light-colored cookies.
Don’t be afraid to get creative with additional decorations based on what catches your eye in the Halloween section. Ghost Peeps, chocolate spiders, or even small plastic decorations (clearly marked as non-edible when serving) can enhance your Haunted Oreo Graveyard Cake theme.

Mastering the Preparation Process
Baking the Perfect Spooky Base
Creating the ideal cake base for your Haunted Oreo Graveyard Cake begins with proper preparation. Preheat your oven to exactly 350°F – an oven thermometer can help ensure accuracy, as many ovens run hot or cold. When greasing your 9×13 inch baking dish, consider using a baking spray that combines oil and flour for the most effective release.
When mixing your devil’s food cake batter, avoid overmixing, which can develop too much gluten and result in a tough cake. Mix just until the ingredients are combined and no dry spots remain. Pour the batter evenly into your prepared pan, smoothing the top with a spatula to ensure even baking.
During baking, resist the urge to open the oven door frequently as this causes temperature fluctuations. Check for doneness using the toothpick test – insert a toothpick into the center of the cake; it should come out with a few moist crumbs but no wet batter. The 10-15 minute cooling period after baking is crucial – the cake should be warm enough to absorb the liquid additions but cool enough that it doesn’t fall apart when poked.
Creating the Perfect Poke Cake
The poke cake technique requires attention to detail for best results. Use a wooden spoon handle (or similarly sized round tool) to create holes approximately 1/2 inch apart across the entire surface of your Haunted Oreo Graveyard Cake. Make sure the holes go at least halfway down through the cake to allow for proper absorption of the sweet liquid additions.
Pour the sweetened condensed milk slowly and evenly across the entire cake, pausing occasionally to allow it to sink in. Then follow with the warmed hot fudge sauce, which should be warm enough to pour easily but not so hot that it damages the cake structure. Use a spatula to gently spread the sauces, ensuring they seep into the holes rather than pooling on the surface.
After adding both liquids, allow the cake to cool completely before moving on to the next step. This cooling period, which may take up to an hour at room temperature or can be expedited in the refrigerator, is essential for the liquids to fully absorb and for the cake to set up properly before adding the toppings.
Decorating Your Haunted Graveyard
Patience is key when creating your Haunted Oreo Graveyard Cake masterpiece. Wait until the cake is completely cool before spreading the whipped topping. Use an offset spatula for the smoothest application, creating an even layer that resembles a blanket of fog over your cemetery ground.
For the Oreo “dirt,” you can achieve different textures based on your crushing method. A food processor produces fine, consistent crumbs that look like soil, while the zip-top bag and rolling pin method creates more varied crumb sizes for a more realistic dirt appearance. Sprinkle the crushed Oreos evenly over the entire surface, making sure to cover all the white topping for the most dramatic effect.
When decorating your tombstone cookies, write names, dates, or spooky phrases using the gel icing or edible marker. “RIP,” “Here Lies,” or funny epitaphs can add personality to your Haunted Oreo Graveyard Cake. Allow the icing to dry completely before inserting the tombstones into the cake to prevent smudging.
Strategic placement of decorations creates the most effective scene. Position tombstones at different angles and depths for a more authentic cemetery look. Place gummy worms so they appear to be emerging from the dirt. Scatter candy pumpkins and bones throughout the scene, concentrating some in small groupings for visual impact.
Complete Haunted Oreo Graveyard Cake Recipe
Ingredients List
- 1 box devil’s food chocolate cake mix (plus ingredients listed on the box)
- 1 (14 oz) can sweetened condensed milk
- 1 (12 oz) jar hot fudge sauce, warmed
- 1 (8 oz) tub whipped topping, thawed (like Cool Whip)
- 20 Oreo cookies, crushed into spooky dirt
- 6–8 Milano cookies (or any oval-shaped cookies), for tombstones
- Black gel icing or edible marker
- Candy pumpkins, gummy worms, candy bones for decoration
Equipment Needed
- 9×13 inch baking dish
- Mixing bowls
- Electric mixer (optional, as per cake mix instructions)
- Wooden spoon with round handle
- Offset spatula or regular spatula
- Food processor or zip-top bag and rolling pin
- Measuring cups and spoons
- Cooling rack
Step-by-Step Instructions
- Prepare the Cake Base: Preheat your oven to 350°F. Grease a 9×13 inch baking dish thoroughly. Prepare the devil’s food cake mix according to the package directions. Pour the batter into the prepared dish and bake as directed, usually about 30-35 minutes. Allow the cake to cool for 10–15 minutes after removing from the oven.
- Create the Poke Cake: While the cake is still warm, use the handle of a wooden spoon to poke holes all over the surface, spacing them about 1/2 inch apart. Slowly pour the sweetened condensed milk over the entire cake, ensuring it fills the holes. Next, pour the warmed hot fudge sauce over the cake, again making sure it seeps into the holes. Let the cake cool completely.
- Add the Frosting Layer: Once the Haunted Oreo Graveyard Cake is completely cool, spread the thawed whipped topping evenly over the surface using an offset spatula. Create a smooth, even layer that extends to all edges of the cake.
- Create the Graveyard Dirt: Place Oreo cookies in a food processor and pulse until finely crushed, or place them in a zip-top bag and crush with a rolling pin. Sprinkle the crushed Oreos evenly over the entire surface of the whipped topping, completely covering it to create the “dirt” of your graveyard.
- Design Your Tombstones: Using black gel icing or an edible marker, write “RIP” or creative epitaphs on the Milano cookies. Allow the icing to dry completely before placing them on the cake.
- Assemble the Graveyard Scene: Gently insert the decorated Milano cookie tombstones upright into the cake, arranging them at different angles for a realistic cemetery look. Place candy pumpkins, gummy worms, and candy bones throughout the scene to complete your Haunted Oreo Graveyard Cake.
- Chill and Serve: For best results, refrigerate the completed cake for at least 1 hour before serving to allow all the elements to set properly. Keep refrigerated until ready to serve.

Expert Tips for a Perfect Haunted Oreo Graveyard Cake
Common Mistakes to Avoid
Creating a spectacular Haunted Oreo Graveyard Cake is straightforward, but there are some potential pitfalls to be aware of. One common mistake is poking holes that are too small or too few, which prevents proper absorption of the sweetened condensed milk and hot fudge. Use a wooden spoon handle or something of similar diameter to create substantial holes.
Another frequent error is not allowing the cake to cool properly between steps. If you add the whipped topping while the cake is still warm, it will melt and create a messy, unappealing surface. Patience is key – allow sufficient cooling time before proceeding to each new step.
Overloading with decorations can make your Haunted Oreo Graveyard Cake look cluttered rather than artistic. Consider planning your decoration placement before committing, perhaps even sketching a quick layout to guide your design.
For the tombstones, a common issue is pressing them too far into the cake, causing them to sink or fall over. Insert them just deep enough to stand upright – about 1/2 inch into the cake is usually sufficient.
Creative Variations
While the classic Haunted Oreo Graveyard Cake is a crowd-pleaser, you can put your own spin on it with these creative variations. For a different flavor profile, try using a red velvet cake mix instead of devil’s food – the deep red color creates a “bloody” effect that’s perfect for Halloween.
To enhance the graveyard atmosphere, consider adding green food coloring to portions of the whipped topping to create patches of “moss” among the Oreo dirt. A little goes a long way, so start with just a drop or two.
For a more elaborate scene, create a pathway through your cemetery using yellow or brown sprinkles to represent a dirt path. Position tombstones on either side of this path for a more organized cemetery layout.
To add dimension to your Haunted Oreo Graveyard Cake, create a small hill or raised area by adding an extra layer of whipped topping in one section before covering with Oreo crumbs. This variation in terrain makes your graveyard scene more realistic.
Make-Ahead and Storage Instructions
The Haunted Oreo Graveyard Cake is ideal for preparing ahead of your Halloween festivities. You can bake the cake and add the sweetened condensed milk and hot fudge up to two days in advance, keeping it covered in the refrigerator. Add the whipped topping and Oreo crumbs the day before your event if needed.
For the best presentation, it’s preferable to add the decorative elements (tombstones and candies) within a few hours of serving. This prevents the cookies from becoming soggy and ensures that everything looks fresh and appealing when presented.
Store any leftover Haunted Oreo Graveyard Cake in the refrigerator, covered loosely with plastic wrap. The cake will remain delicious for up to 3-4 days, though the whipped topping and cookies may begin to soften over time.
If you’re planning to transport your creation to a Halloween party, consider adding the final decorative elements upon arrival to prevent damage during transit. Alternatively, use toothpicks to stabilize tombstones during transportation, removing them discreetly before presentation.

Serving Suggestions
Presentation Ideas
Elevate your Haunted Oreo Graveyard Cake with dramatic presentation. Consider serving it on a black cake stand or platter to enhance the spooky theme. Surround the cake with additional Halloween decorations like plastic spiders, fake cobwebs, or small battery-operated tea lights for an eerie glow.
For maximum impact, dim the lights when bringing out your Haunted Oreo Graveyard Cake and use a flashlight held at a low angle to create spooky shadows across your graveyard scene. This theatrical presentation will delight guests of all ages.
If serving at a Halloween party, consider creating name cards for each tombstone that correspond to your guests. This personalized touch adds fun interaction as everyone searches for their own “grave” in the cake.
For a dramatic centerpiece effect, position your Haunted Oreo Graveyard Cake as the focal point of your Halloween dessert table, surrounding it with smaller themed treats like cupcakes decorated as monsters or cookies shaped like bats.
Complementary Treats
Round out your Halloween dessert offering with treats that complement your Haunted Oreo Graveyard Cake both visually and flavor-wise. Serve mugs of hot chocolate with ghost-shaped marshmallows floating on top – the warm chocolate drink pairs beautifully with the cold, creamy cake.
Apple cider, either hot or cold, provides a seasonal counterpoint to the rich chocolate of the Haunted Oreo Graveyard Cake. Serve it in glasses rimmed with cinnamon sugar for an extra special touch.
For a balanced dessert buffet, offer some fruit options alongside your cake. Halloween-themed fruit skewers with orange segments and blackberries provide a refreshing alternative for guests who might want something lighter to accompany or follow their slice of Haunted Oreo Graveyard Cake.
Frequently Asked Questions
Can I make this Haunted Oreo Graveyard Cake ahead of time?
Yes, this cake is perfect for preparing in advance. You can make the entire cake including the Oreo dirt layer up to 24 hours before your event and store it covered in the refrigerator. For best results, add the decorative elements (tombstones and candies) within a few hours of serving to prevent them from becoming soggy.
If Milano cookies aren’t available, several alternatives work well. Graham crackers cut into tombstone shapes, rectangular shortbread cookies, or even Pepperidge Farm Chessmen cookies can serve as tombstones. The key is finding a light-colored, firm cookie with enough surface area to write on with your black gel icing.
To keep your tombstones upright, insert them at least 1/2 inch into the cake, making sure they go through the Oreo layer and into the whipped topping and cake beneath. If they still seem unstable, you can support them from behind with small pieces of additional cookies hidden in the Oreo dirt. For extremely top-heavy decorations, a small dab of icing at the base can act as “glue.”
Can I use homemade whipped cream instead of Cool Whip?
Yes, you can substitute homemade whipped cream, but you’ll need to stabilize it to ensure it maintains its structure. To make stabilized whipped cream, dissolve 1 teaspoon of unflavored gelatin in 1 tablespoon of cold water, then heat until dissolved. Cool slightly before whipping 2 cups of heavy cream with 1/4 cup powdered sugar to soft peaks, then slowly drizzle in the gelatin mixture while continuing to beat until stiff peaks form.
How long does the Haunted Oreo Graveyard Cake stay fresh?
The Haunted Oreo Graveyard Cake will remain delicious for 3-4 days when stored covered in the refrigerator. Over time, the Oreo crumbs and cookie tombstones may soften slightly as they absorb moisture from the whipped topping, but this doesn’t significantly impact the taste – some people even prefer this softer texture!
Why This Haunted Oreo Graveyard Cake Will Be the Hit of Your Halloween Party
The Haunted Oreo Graveyard Cake offers the perfect combination of delicious flavors and spooky visual appeal that makes it an ideal centerpiece for any Halloween gathering. Its dramatic presentation guarantees gasps of delight when you bring it to the table, while the rich, moist cake beneath ensures everyone will be coming back for seconds. The best part? Despite its impressive appearance, this cake is accessible to bakers of all skill levels and offers plenty of opportunities for personalization.
We encourage you to make this Haunted Oreo Graveyard Cake your own by experimenting with different decorations, adding personalized tombstone messages, or creating a unique cemetery layout. Share photos of your creation on social media to inspire others and preserve the memory of your Halloween masterpiece. Most importantly, enjoy the process of creating this fun, festive dessert – the joy of making it is almost as sweet as eating it!
More Related Recipes You Might Enjoy
- Summer Fruit Tart – Another impressive dessert centerpiece that uses a similar decorative approach, perfect for warmer seasons when you want something bright and colorful.
- Christmas Eve Cinnamon Vanilla Creamy Custard Pie – If you enjoy rich, creamy desserts like this graveyard cake, this holiday pie offers similar indulgence with seasonal winter flavors.
- Witch Hat Chocolate Cookies – Another Halloween-themed treat that would pair perfectly with your Haunted Oreo Graveyard Cake for a complete spooky dessert table.

Haunted Oreo Graveyard Cake: 10 Spectacular Decoration Tricks
- Total Time: 3 hours (including cooling and setting time)
- Yield: 12–16 servings 1x
Description
This Haunted Oreo Graveyard Cake is the ultimate Halloween dessert showstopper. Rich devil’s food chocolate cake is soaked with sweetened condensed milk and hot fudge, then topped with whipped cream, crushed Oreos resembling dirt, and decorated with cookie tombstones, candy pumpkins, and gummy worms for a spooky cemetery scene that’s as delicious as it is fun to create.
Ingredients
- 1 box devil’s food chocolate cake mix (and ingredients listed on the box)
- 1 (14 oz) can sweetened condensed milk
- 1 (12 oz) jar hot fudge sauce, warmed up
- 1 (8 oz) tub whipped topping, thawed (like Cool Whip)
- 20 Oreo cookies, crushed into spooky dirt
- 6–8 Milano cookies (or any oval-shaped cookies), for tombstones
- Black gel icing or edible marker
- Candy pumpkins, gummy worms, candy bones — your haunted decorations of choice!
Instructions
- Preheat oven to 350°F. Grease a 9×13 inch baking dish. Mix and bake the devil’s food cake according to the directions on the box. Let it cool for about 10–15 minutes once it’s out.
- Use the handle of a wooden spoon and poke holes all over the cake. Pour the sweetened condensed milk all over, letting it sink into every nook and cranny. Follow it up with the warmed hot fudge sauce.
- Once the cake is totally cool, spread the whipped topping all over the top like a ghostly cloud.
- Crush up the Oreos using a zip-top bag and a rolling pin, or a food processor. Sprinkle the cookie dirt right over the whipped topping, covering it edge to edge like a creepy graveyard floor.
- Write spooky names or “RIP” on the Milano cookies using black gel icing or edible marker — these are your tombstones. Press them upright into the cake.
- Tuck in a few candy pumpkins, stick in some gummy worms trying to escape the ground, and toss on candy bones for that eerie final touch.
Notes
- For best results, refrigerate the completed cake for at least 1 hour before serving to allow all the elements to set properly.
- If Milano cookies aren’t available, graham crackers cut into tombstone shapes work well as an alternative.
- To prevent tombstones from falling over, insert them at least 1/2 inch into the cake, ensuring they go through the Oreo layer and into the whipped topping beneath.
- The cake can be made up to 24 hours in advance; add the decorative elements within a few hours of serving for best presentation.
- Prep Time: 30 minutes
- Cook Time: 30 minutes
- Category: Dessert
- Method: Baking
- Cuisine: American
Nutrition
- Serving Size: 1 slice (1/12 of cake)
- Calories: 425
- Sugar: 38g
- Sodium: 350mg
- Fat: 18g
- Saturated Fat: 9g
- Unsaturated Fat: 7g
- Trans Fat: 0g
- Carbohydrates: 62g
- Fiber: 2g
- Protein: 5g
- Cholesterol: 45mg